Friday, 9 March 2012

Run up to Mothers Day

Hope you're all prepared!  I've been working on a new project, but not the one I originally planned to do!  Funny how often that happens...


I started out trying to make a 'Bee Happy' necklace, but it ended up too big and I was worried the letters wouldn't be strong enough for a pendant if I made them smaller.  Instead I ended up with these!


They're fridge magnets, and I got the chance to try out my glitter varnish.  The silver one is really great, it leaves a totally smooth gloss finish with a bit of sparkle (you can just spray it again for more), I haven't really tested the iridescent one yet.  I covered everything except the wings, rainbows and gold coins with masking tape and sprayed with glitter varnish, then painted the rest with 2 coats of gloss varnish.  Painting the gloss on can be a bit streaky, the spray stuff seems like a better option so I may investigate some plain spray on varnish once I've used up what I've got.  I'm pleased with the results, and I'll definitely be making more!  Probably with names on, and I have sketched ideas for 'Hope', 'Dreams' and 'Peace'.  I'm heading up to Yorkshire on monday though for 3 weeks for a music project, so not sure how much I'll be able to do.  I'm hoping to do another tutorial, but we'll have to see what happens!  If I can't do a tutorial, I'll hopefully manage to do a book review.  I bought 3 books off amazon, two on making polymer clay models and one on metal jewellery stamping.  Really looking forward to reading them but I'm saving them til I get to Leeds!

Friday, 2 March 2012

A Few New Creations

Hello all,


I've managed to get this bug that's been going round.  Yesterday I felt like my tonsils were the size of golf balls.  Eugh.  :(  It wrote the day off a bit.  I got my super strong wire delivered, but I didn't feel very creative!  I can however whole heartedly recommend the healing power of lemon, ginger and echinacea tea with a spoonful of honey and, most importantly, a soft baked chocolate cookie.  Nom.


Instead yesterday I set up my photo cube and photographed my new designs ready to put in my shop.  I've also discovered www.fotofuze.com, an amazingly simple way of removing 'almost-white' backgrounds from product photos and making them really pop.  I think it looks much better than my other pics, but I'm still not sure I prefer it to some of the product photos in my favourite Etsy shops.  It looks very clean, but a bit harsh IMO.  I've seen some lovely photographs done on wood, or pale patterns.  Anyway, here are my latest items!


This is my one of my new charm necklaces :) The tibetan silver coin is reversible, and both parts of the necklace are on separate jump rings so you can wear both, or one or the other.  You can also combine them with my other charm necklaces, like this 'Love Paris' necklace.


This one is reversible too, and again all the charms are on different rings so you can change the order or combination.  I'm thinking about stocking the individual charms too.  I also have another charm necklace, designed for an 18th or 21st, with a pearl, a key and a birthstone.

The other thing I said I'd post about, was my new stamping blanks!  I bought them from  StampingBlanks on Etsy.  They're stainless steel, which is just as beautiful as silver, but doesn't tarnish or rust, and is totally hypo-allergenic.  It's also really durable and cheaper than sterling silver, so I thought I'd give it a go.


First thing I noticed is how shiny these discs are, they really are just like polished silver.  They arrive with the mirrored surface protected by a sticker so they stay in perfect condition, and the reflectiveness makes it easier to line up the letters on the stamps.  I haven't filled in the letter yet, so it's still a work in progress, but I'm very pleased with the initial results and I'm looking forward to my bigger discs arriving.  Well worth considering as a silver alternative!
Finally, I'm offering 10% off everything in my shop 'cause it's nearly Mother's Day, just use the code 'MUM10' at checkout.  :)

Tuesday, 28 February 2012

Made it home, time for a cuppa!

Hello all!


I've had a busy week and a bit, staying in beautiful Dorset focussing on my music stuff, so I've slacked on posting...Sorry!  Being in the lovely countryside has given me some more ideas for some home items though, and it's a great place to relax!


I arrived home to lots of post, including stainless steel stamping blanks, which I am very excited about.  They look just like silver, but won't tarnish in the same way and are cheaper.  Looking forward to trying them out.  I also got some keyring blanks which I'm planning to use with some of my photography work, and these...


Glitter varnish!  These are for my new project, but I'm waiting for a couple more bits to arrive before I can start on it.  I'll be using them on polymer clay shapes.  Watch this space!  I've got some more bits to photograph and post on Etsy that I made over my trip away, but I'll have to do that in the daylight.

Finally, I will be holding a stall at a craft fair in April in Leicester (more details to come), which will hopefully coincide with the launch of my new name and website.  I will be leaving JewelleryByKat in favour of something more permanent, and more interesting!  Hopefully something that will encompass my jewellery, photography, and maybe a few other bits and pieces too.

Tuesday, 21 February 2012

Beautiful Sunny Day in Dorset!

Okay, so I've slacked a little on the posting and tutorial-ing, just been keeping to my target of posting at least one new item a day in my shop and keeping on top of admin in the 'Critique Me' Etsy team.  I'm in Dorset at the moment, which is beautiful, and I've been busy crafting, but am without my usual photo set up so can't put any of my new creations in the shop until next week.

I went for a walk round Shaftesbury yesterday, and I went to see Gold Hill, or the Hovis hill, if you prefer! :P

I also popped into the fab bead shop at the top of the hill, as I always do, and bought some pretty things.  Not quite sure what I'll do with them but they just caught my eye!  Amongst other things I bought some shell beads and some gorgeous tanzanite coloured glass beads...I really love the unusual shape of them, they really sparkle!  If you ever pass by, check out The Beadster, or check it out online.


Also, today my boyfriend did some charity shop perusing in my absence and bought me a little present...


Cheeky or what?  :P  It's actually not as fluffy as the cover suggests, but that isn't why he bought it!


Tuesday, 14 February 2012

Happy Valentine's Day!

Hello all,


I've never been a big one for valentine's personally, but I did get a beautiful rose delivered this morning, so I'm not complaining :P  Isn't it gorgeous?  :)  It's from a little florist in town.  I just love the little crystal heart in it.


Did any of you get anything handmade for valentines?


I've been away doing musical things all weekend so I haven't posted in a while (including an album launch! :D).  I am currently waiting for stamping blanks to arrive, I bought a set of letter stamps from Lori at SupplyZone on Etsy, and I can't wait to try them out.  All you jewellery makers, go and look at her stuff (and tell her JewelleryByKat sent you), she has a whole shop full of lovely stuff to inspire your creations.  I'll post pictures of my stamped things once I've got them!


These are the ones I bought, I bought both upper and lower case sets.  I'm going to get a slightly bigger set for doing single initials at some point, these are beautiful but at 2mm are (obviously) very small!  Have a look - Handwritten stamps.


I'm also planning my next tutorial, I think it will be the floating necklace, possibly in purple swarovski and pearl, or maybe AB clear swarovski, I haven't quite decided.  It may have to wait though, I'm recording another album next week, as you do!  I also have a floating bracelet in mind, so hopefully I'll get time to do that this evening and put some pics up.

Wednesday, 8 February 2012

First tutorial - Polymer Clay Kitten

Okay, so here is my first tutorial.  Please ignore the slightly scary white balance (and the slightly scarier blue nail polish...curiosity and a new colour got the better of me...)


This is a tutorial aimed at beginners to make this little guy.  Here's what you need:


  • Polymer clay (goes without saying really) in black, white and pink.  I don't have pink so I'm using red and white.  I'm using Sculpey Premo brand, but there are quite a few brands to choose from.
  • A clay cutter.
  • Some sort of non-stick mat.  I'm using a laminated place mat.
  • A rolling device.  I have an acrylic tube but I've seen this done with a can of hairspray.  Anything non-porous is fine.
Through trial and error I've realised the best thing is to start by making the white shapes you need, otherwise you'll end up transferring colour from other clay to the white.  You need to roll the clay around in your hands to make sure it's all soft and the same consistency throughout.  You can roll it out too if you prefer with your rolling pin-type-thing, just to make sure it's all warm and well mixed.  The white picks up fluff really easily, I used a sharp point to pick out the obvious bits.


First you're making what will be his white stomach.  You just take a little ball of white clay and roll it around in your fingers, then press firmly onto the table to flatten it out into roughly an oval shape.  If it's the wrong size just roll it up and try again.

Then you need to make what will be the paws and eyes.  To make each eye or paw the same size, make one ball of clay and split it down the middle.  You can leave them as balls for now, their eventual shape will be more obvious later on.


For his individual 'claw' bits, make a really (really) thin roll of clay and cut thin cylinders off it.  Put all these bits to one side for later.


Next you're making the body and head.  Roll out some black clay til it's soft, and then make two balls, one a bit larger than the other.


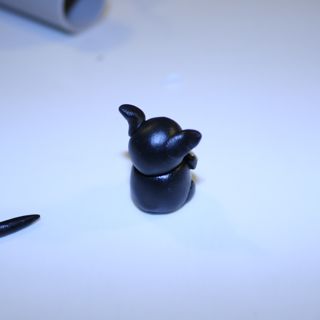
Then you need to make the paws and ears.  Again separate out and roll two little balls of black clay, then split each in half (so you get ears and paws of the same size).  For the ears, roll each half a ball into a cylinder, and squeeze one end between your finger and thumb so you get a teardrop shape (left pic below).  For the paws, press the ball mostly flat on the table (right pic below), then shape it into a sort of, soft semi-circle.


For the tail, just roll another cylinder of clay that tapers off at one end.


Now time for phase two!  Assembling.  Phew.


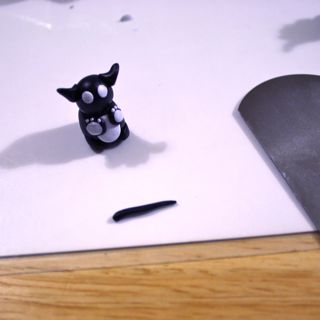
Put the head onto the body, and then put the flat white oval from the first bit of the tutorial onto the kitten's middle.  Then you put the semi-circle black paws on, and the flattened small balls of white that you made at the start.  You then dot on the tiny bits of white as little 'finger' claws.


Next you put his ears on.  Squish a little flat bit at the wide end of the ear, and press it to the side of the kitten's head.  This will be strong enough once baked to hold his ears on.  The tail just goes on up his back.  Again squish a little flat bit and stick that underneath, then 'wiggle' his tail up his back.  Make sure even the tip of his tail touches his head or body, otherwise it could snap off during baking.  You then put the white eyes on (flatten out the balls you made earlier), and cut two tiny bits of black for his pupils.


Now all that's left is a nose!  If you have pink clay, just add a little dot of that.  I didn't, so very quickly here's an easy clay blending method.  A tutorial within a tutorial, if you will.

Clay blending to make one constant colour, dead easy!


Take a small amount of red, and a lump of white.  Press the red into the white and roll it out.  Fold it up and roll it out again repeatedly until all of the clay is the same colour throughout.  You can save the rest of this pink in cling film, so don't worry about making lots more than you need for a nose!


Once you've put his nose on, that's it!  :)  At this stage you can add a loop if you want him to be a keyring or pendant.  You can use a metal 'eye' with a screw, but personally I'd use an eye pin as it will be much thinner and won't displace the clay as much.  Just cut off an eye pin (leave around 5mm straight pin) and push it into his head (ouch!) before baking.

  You just need to bake your little fella and he's finished.  For Premo Sculpey, I bake (on baking paper as well as a tray...don't want him to stick) for 30 mins at 130 degrees, but it will say on the pack of clay what time and temperature to use.  When he's done and cooled, you can glaze him (using polymer clay gloss or varnish), or leave as is.  If you want to paint on whiskers, you can use acrylic paint after he's been baked (before the gloss).

So that's it, my first tutorial.  I'd be really interested to hear your feedback and see what you make! :)  He'll be available in my Etsy shop soon.


Tuesday, 7 February 2012

Wedding jewellery and some Fimo


Today I've been busy.  I made this necklace, it's been in my head for a while, this 'floating' idea.  I made a predecessor to this for myself to wear in capri blue and crystal moonlight swarovski on illusion cord, which I found was a bit too flexible.  This one is on jewellery wire, and I'm really happy with it!


I've got a bracelet and earrings in the same colour scheme in my shop too, I really love ruby and pearls, I think it's a really classic wedding combination.  As a musician, I've played at lots of weddings and seen lots of really exciting and lovely colour schemes, but there's just something really nice about this one.  All my ruby and pearl things are in my 'Special Occasions' shop section here.


The other thing I've been doing over the last few days is experimenting with Premo Sculpey clay, like Fimo.  I've made a load of heart beads in bright colours, but I've also been making more exciting things...


This is my first little critter, I think he's a keeper.  He is about 25mm tall, so was quite fiddly for a first project but I'm pleased with him.  I also made an elephant yesterday so I'll put some pictures on once he's fully assembled and done.  I'm planning to do a beginner's tutorial on this little kitten, there are some really fantastic youtube videos on how to make more complicated things, but not as much for proper beginners, and this little fella is fairly easy, would be a great project for kids with a bit of assistance.  The one I make for the tutorial will also be available in my Etsy shop, I just haven't decided if he'll get a pin in his ear or head (ouch) to make him into a keyring, or if he'll just be a figure.


Now, what other animals can I make? :)